In the sprawling world of The Blood of Dawnwalker, players often find themselves drawn into intricate narratives and compelling characters. One such quest, “Buried Past,” introduces Coen to a pivotal figure from his father’s life: Volk, a blind former mercenary. This optional questline presents players with meaningful choices that impact the story’s progression. Should you aid Volk in his time of need, or prioritize your own family’s needs? Let’s delve into this quest and explore the consequences of your decisions.
Navigating “Buried Past”: A Step-by-Step Guide
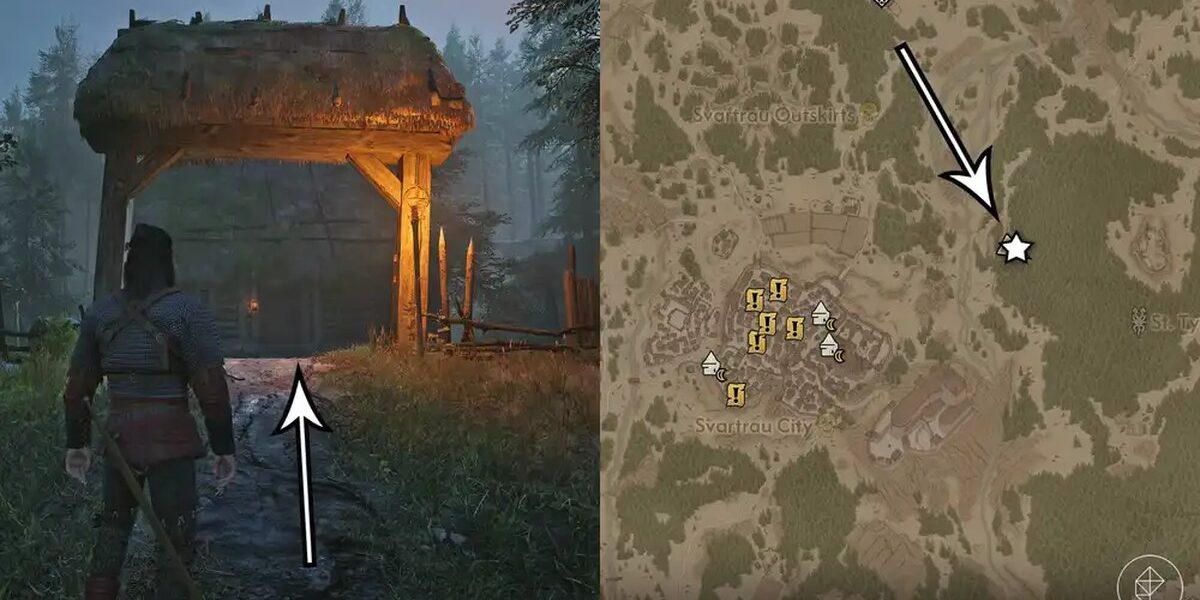
The “Buried Past” quest becomes available shortly after completing The Blood of Dawnwalker’s prologue. While it can be stumbled upon organically, speaking with the grocer in Maragir Crossroads can provide a helpful clue: he mentions that Coen’s father used to purchase alcohol from him before venturing into St. Tyna’s Grove. Alternatively, you can bypass this initial step and head straight to Volk’s dilapidated hut, located northeast of Svartrau City.
To initiate “Buried Past,” you must carefully inspect the ruined hut using your focus mode. Upon entering, you’re immediately confronted by Volk. Whether you win or lose this initial skirmish, telling him that you are Pieter’s son will earn his trust and open up the questline.
Making Key Decisions: Training, Treasure, and Helping Volk
“Buried Past” unfolds over several in-game days, requiring patience as you wait for opportunities to interact with Volk. The quest ultimately boils down to three crucial decisions:
- Decide whether to train with Volk or not.
- Choose whether to help Volk find Pieter’s hidden treasure or not.
- Ultimately, decide whether to actively help Volk (completing optional objectives) or not.
While the first two decisions are relatively straightforward, the third decision—whether to assist Volk—is interwoven throughout the questline and significantly impacts its outcome. Let’s examine each of these choices in detail.
Training with Volk: A Test of Skill
During your third visit to Volk, he proposes a sword fighting training session. Agreeing or declining this offer won’t alter the overarching story, but accepting will grant you an Artery Strike Manual (a valuable skill). The outcome of the fight itself is irrelevant; focus on gearing up beforehand as Volk can be surprisingly challenging for a blind man.
The Search for Pieter’s Treasure: A Moral Dilemma
After your third conversation, Volk brings up the subject of Pieter’s fortune. He reveals that Coen’s family never possessed significant wealth, leading him to believe that Pieter had buried a treasure somewhere. He then asks for Coen’s assistance in locating it, presenting you with a choice: agree or refuse to help Volk find Pieter’s treasure.
If you choose to assist Volk, travel to the quest area located just north of Parlita (a village northwest of Svartrau City) and follow the trail leading southwest. You’re looking for a lookout point in the forest where Pieter’s treasure is buried next to a tree. Don’t forget to grab the shovel left at the old campfire.
Upon inspecting the chest, you’ll receive Pieter’s Garb (a legendary light chest armor). To progress the quest, visit the Maragir Monastery in the northeast during the day and speak with the monk near the font entrance. Your response (angry or proud) won’t affect the story’s progression.
Return to Volk and inform him of your findings. He will be disappointed and request that you return the following day. The subsequent events depend on whether you chose to help Volk or not (see below).
The Consequences of Refusal: A Path of Conflict
If you refuse to search for Pieter’s “blood money,” Volk will ask you to return the next day to discuss it further. However, upon your return, you’re ambushed by a couple of soldiers. After defeating them, Volk emerges, admitting his betrayal. This presents you with another critical decision: fight Volk or spare him.
If you choose to fight and kill Volk, you must eliminate him. If you spare him and return the following day, you’ll find Volk’s corpse inside his hut.
Helping Volk: Completing Optional Objectives
To actively help Volk, exhaust all dialogue options (by pressing the white lines before selecting a yellow line) during your conversations with him. This will reveal optional objectives that allow you to assist him in his time of need. Rushing through the conversation without exploring these options will cause you to miss opportunities to aid him.
Whether you choose to complete all the optional objectives is entirely up to you, but it’s important to know that it significantly impacts the quest’s outcome. Here’s a list of all the optional objectives and the time they require:
- Get rid of the wolves (first visit): Requires two time segments in total.
- Chop wood (first visit): Requires one time segment.
- Give slivovitz (second visit): Doesn’t take time, but requires looting or purchasing alcoholic drink.
- Gather feverfew by the riverbank (second visit): Costs two time segments; preparing the ointment takes another time segment.
- Board up the bedroom window (third visit): Requires one time segment.
- Find Volk’s knife (third visit): Requires no time. Located on the roof, requires inspecting pile of puke in front of door and asking about it to unlock objective.
To truly help Volk, ensure you complete every optional objective. It appears that even completing most objectives but skipping one, such as chopping wood or providing slivovitz, will prevent you from achieving the “you helped Volk” outcome.
The Outcome of Helping Volk: A Moment of Truth
Upon your final visit, if you’ve aided Volk, you’re met with a grim scene: two dead soldiers and a note from Volk informing you that he left his house. He claims that Brencis wanted him to trap you, but he refused. You’ll find Volk’s Sword inside the house.
However, be warned that Volk’s note doesn’t reveal the entire story. If you visit during the day, you can use witchcraft to compel the corpse in the garden and uncover the truth: Volk initially contacted the soldiers to sell you out, but he changed his mind due to your assistance.
The Alternative Outcome: Refusal and Regret
If you choose not to help Volk, you’re presented with a different path. You’ll receive the same outcome as refusing to search for Pieter’s treasure. Volk will ask you to return the next day, but upon your arrival, Brencis’ soldiers will attack. After defeating them, Volk emerges and presents you with a final decision: should you kill Volk?
If you spare him, he’s left shouting insults as you walk away. If you return at least a day later, you’ll find Volk’s corpse inside his hut. If you choose to fight and kill Volk, you can loot Volk’s Sword and 200 denari from his body.
“Buried Past” is a quest filled with difficult choices that shape the narrative of The Blood of Dawnwalker. Whether you choose to train with Volk, search for Pieter’s treasure, or ultimately decide to help him, your decisions will have lasting consequences. Choose wisely and embrace the challenges that await!






Comments
Be the first to comment.